Advertisement

Friday, March 29, 2019

Oracle Database RAC: Create Application VIP (CRS-2534)

In this blog I list out the steps to be used to create application specific VIP on Oracle Cluster


$ srvctl remove network -k 2
$ srvctl add network -k 2 -S 172.31.2.208/255.255.255.240
$ crsctl start resource ora.net2.network
$ crsctl add type ora.cluster_vip_net2.type -basetype ora.cluster_vip.type
$ appvipcfg create -network=2 -ip=172.31.2.214 -vipname=myvip -user=root -failback=1
$ crsctl start resource myvip-n myserver01
$  ifconfig | grep 214
$ crsctl modify res myvip -attr "HOSTING_MEMBERS=myserver01 myserver02"
$ crsctl stop resource myvip
crsctl start resource myvip -n  myserver02

This also takes care of error CRS-2534

Tuesday, March 19, 2019

Oracle Database 12,18,19: Practices for using ASMLib with Multipath Devices (Linux 7)

In this document I list out the key things to keep in mind when using ASMLib with Multipathed devices

 1. Ensure to have the right Scan order (ORACLEASM_SCANORDER AND EXCLUDE)
to find out the right configuration for your type of multipathing you can refer

Remember you will need to put the right value as per the type of your multipathing - Linux Native, Multipathd, Emc etc


2. Ensure to create file /etc/udev/rules.d/99-oracle-asmdevices.rules
This file is used to set the right permissions on reboot of the node.
For this you can refer - 
https://access.redhat.com/solutions/272153
or 
Redhat Reference Document: https://access.redhat.com/sites/default/files/attachments/deploying_oracle_rac_12c_rhel7_v1.2_updated_08-01-2016.pdf 

3. Ensure to start oracleasm.service after multipathd and iscsci
$ cat /usr/lib/systemd/system/oracleasm.service
[Unit]
Description=Load oracleasm Modules
Requires=multipathd.service iscsi.service

After=multipathd.service iscsi.service

The configuration can be quite complex when using multipath devices. In case you are facing any issues you can contact me, I will be glad to help. 

Friday, March 15, 2019

Oracle Database 11g/18c: Installing 11gr2 on 18c (Things to Keep in Mind)

In this blog I list out key things to keep in mind when doing installation of 11gR2 on 18c Cluster
This can be a useful case when you are thinking of migrating and Upgrading your infrastructure.


1. Keep Note of all the rpms and create a superset of both lists of 18c and 11g.
elfutils-libelf-devel.x86_64 is the rpm which is missing from 18c install. 

2. Prefer ASM LIB always for installation 
For RHEL - the kmod-oracleasm is available from RHN or in the Product DVD
for other libraries use - https://www.oracle.com/technetwork/server-storage/linux/asmlib/rhel7-2773795.html

3. If you want to share some FS with your previous severs, remember to create the users/groups with same UID / GID.

4. In the Grid Installation 


5. Before DB Binaries Installation, follow below docs - 
  • RAC RDBMS Installation fails with Error:"PRVF-4037 : CRS is not installed on any of the nodes" (Doc ID 2315020.1)
  • Error PRVF-4037 On Install Of Oracle Database 11.2 Binaries With 12.2.0.1 Grid Infrastructure (Doc ID 2302700.1)
  • PRVF-4037 : CRS is not installed on any of the nodes (Doc ID 1316815.1)
  • error in invoking target 'agent nmhs' of make file ins_emagent.mk while installing Oracle 11.2.0.4 on Linux (Doc ID 2299494.1)     
  • Linux:CVU NTP Prerequisite check fails with PRVF-7590, PRVG-1024 and PRVF-5415 (Doc ID 2126223.1)          

And as always refer MoS for any other erros.

Thursday, March 14, 2019

Oracle Database 18c: Apply -applyRU Patch before Grid Installation 18.5.0.0.0

With the advent of newer features with Oracle Releases.
One of the good feature of 12c Series is to patch the GI release to latest patch even before the installation.

This has now become possible because of the image based installation, as the zip file is just a "tar ball" of the Grid Home with re-linking required

If you want you can patch to the latest release then after unzipping the home - 

1. Download the Patch
2. Stage it
3. Ensure OPatch is of the version as mentioned in Read me 
4. Apply Patch 

In this example or a one liner I apply patch for 18.5.0.0.0 

$ cd $GRID_HOME
$ ./gridSetup.sh -silent -applyRU /oracle/patch/28828717
Preparing the home to patch...
Applying the patch /images/oracle/28828717...
Successfully applied the patch.
The log can be found at: /opt/oracle/oraInventory/logs/GridSetupActions2019-03-13_05-09-20AM/installerPatchActions_2019-03-13_05-09-20AM.log
Launching Oracle Grid Infrastructure Setup Wizard...

[FATAL] [INS-40426] Grid installation option has not been specified.

   ACTION: Specify the valid installation option.

The last error is ignorable.

If you want to apply one Offs then 
./gridSetup.sh -silent -applyOneOff <unzipped Path of the Patch>

Wednesday, March 13, 2019

Oracle Database 18c/19c: "-Networks" Parameter for cluvfy

In this blog I tell you, how do you specify, how to specify the settings for cluvfy run for -networks parameter.
this parameter is used to tell which all networks are going to perform what tasks in you cluster install.

An example as below. 


./runcluvfy.sh stage -pre crsinst -n MUMR1DB001,MUMR1DB002 -r 18 -networks "bond0.111"[:1[PUBLIC]]/"bond2" -osdba dba -osoper dba -orainv dba -asm -presence local -asmgrp dba -asmdev /dev/oracleasm/disks/OCR_VOTE1,/dev/oracleasm/disks/OCR_VOTE2,/dev/oracleasm/disks/OCR_VOTE3  -crshome /opt/oracle/product/180/grid -fixup -verbose


In this example 
-networks is 
"bond0" - ethernet name
:1 - Subnet ID
PUBLIC - Type of Interface
then a \ is a seperator
finally bond2 is the second interface (will be taken as private by the cluvfy)


For 18c: cluvfy Reference see below address.
https://docs.oracle.com/en/database/oracle/oracle-database/18/cwadd/cluster-verification-utility-reference.html#GUID-B445A858-9F00-4423-990E-109545AC11C3

Thursday, February 28, 2019

Oracle Database 19c: Grid Infrastructure / RAC Installation - Part 3/3

In this part we do the real installation. 
This is a 3 Blog Series and this is Blog 3 (final)
Of this Blog series - 
Part 1
Part 2 


This assumes
1. You have setup your linux machine
2. Made a clone and changed the hostname
3. Assigned IP addresses to Public and private interfaces
4. Unzipped grid software in /u01/app/190/grid
(unzip -qq V981627-01.zip -d /u01/app/190/grid)

Cluster Pre-install
1. Setup passwordless ssh between users
cd /u01/app/190/grid

2. 
[As grid]

$ cd deinstall

$ ./sshUserSetup.sh -user grid -hosts "rac19c01 rac19c02" -noPromptPassphrase -confirm -advanced

2. run Cluster Verification and resolve issues if any 

$ cd /u01/app/190/grid
$ ./runcluvfy.sh stage -pre crsinst -n rac19c01,rac19c02  -orainv oinstall  -osdba dba -verbose

Ensure Cluster Verification is successfull. 

3. Start with Installation
[Next login using grid user]
$ cd /u01/app/190/grid/

$ ./gridSetup.sh

Step 1 - 

Step 2 - 

Step 3 - 

Step 4 - 


Step 5 - 

Step 6 - 


Step 7 -  (I have configured not to configure Grid Repo - but you should do so in production) 

Step 8 -  Change Discover String to "/dev/oracleasm/disks/*"

Step 9 - 

Step 9.1 - Set default password - an warning will come if you have not met oracle standards for password. you can ignore and continue. 

Step 10 - 

Step 11 - 

Step 12 - 

Step 13 - 

Step 14 - 

Step 15 - 

Step 16 - 


Step 16.1 - Ignore RPM DB Check and Continue 

Step 17 - 


Step 18 - 


Step 18.1 - 

Step 18.2
Run Root Scripts as in order 
[Node 1 ] 
$ /u01/app/oraInventory/orainstRoot.sh
[Node 2 ]
$ /u01/app/oraInventory/orainstRoot.sh

[Node 1 ]
$ /u01/app/190/grid/root.sh

[Node 2 ]

$ /u01/app/190/grid/root.sh


Logs of each can be found in the end of the blog page.

Click "OK" after all the root scripts are executed.

Step 18.3 


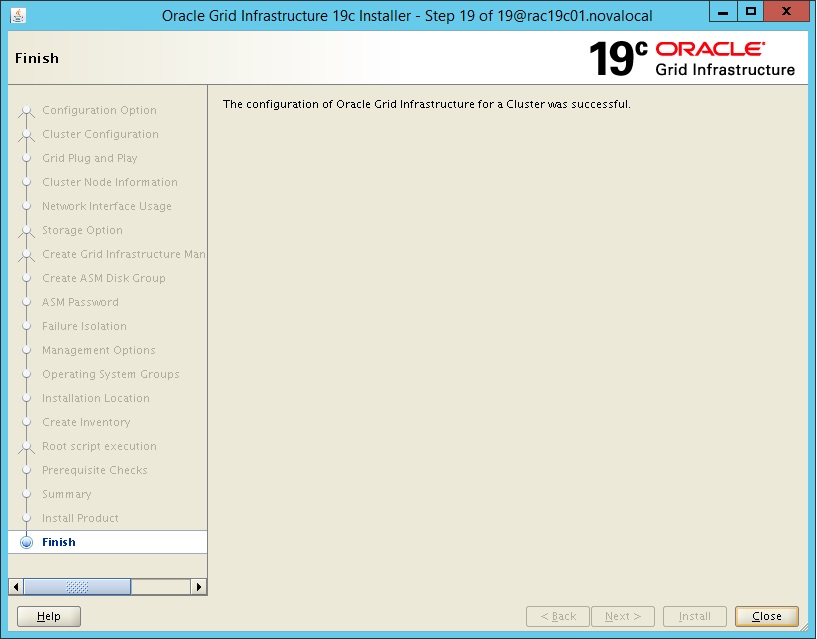
Step 19 
Click Close and Complete the Installation 


Logs
[Node 1 - orainstRoot.sh]

[root@rac19c01 ~]# /u01/app/oraInventory/orainstRoot.sh
Changing permissions of /u01/app/oraInventory.
Adding read,write permissions for group.
Removing read,write,execute permissions for world.

Changing groupname of /u01/app/oraInventory to oinstall.
The execution of the script is complete.

[Node 2 - orainstRoot.sh]
[root@rac19c02 ~]# /u01/app/oraInventory/orainstRoot.sh
Changing permissions of /u01/app/oraInventory.
Adding read,write permissions for group.
Removing read,write,execute permissions for world.

Changing groupname of /u01/app/oraInventory to oinstall.
The execution of the script is complete.

[Node 1 - root.sh]
[root@rac19c01 ~]# /u01/app/190/grid/root.sh
Performing root user operation.

The following environment variables are set as:
    ORACLE_OWNER= grid
    ORACLE_HOME=  /u01/app/190/grid

Enter the full pathname of the local bin directory: [/usr/local/bin]:
   Copying dbhome to /usr/local/bin ...
   Copying oraenv to /usr/local/bin ...
   Copying coraenv to /usr/local/bin ...


Creating /etc/oratab file...
Entries will be added to the /etc/oratab file as needed by
Database Configuration Assistant when a database is created
Finished running generic part of root script.
Now product-specific root actions will be performed.
Relinking oracle with rac_on option
Using configuration parameter file: /u01/app/190/grid/crs/install/crsconfig_params
The log of current session can be found at:
  /u01/app/grid/crsdata/rac19c01/crsconfig/rootcrs_rac19c01_2019-02-28_10-15-19AM.log
2019/02/28 10:15:31 CLSRSC-594: Executing installation step 1 of 19: 'SetupTFA'.
2019/02/28 10:15:31 CLSRSC-594: Executing installation step 2 of 19: 'ValidateEnv'.
2019/02/28 10:15:31 CLSRSC-363: User ignored prerequisites during installation
2019/02/28 10:15:31 CLSRSC-594: Executing installation step 3 of 19: 'CheckFirstNode'.
2019/02/28 10:15:33 CLSRSC-594: Executing installation step 4 of 19: 'GenSiteGUIDs'.
2019/02/28 10:15:34 CLSRSC-594: Executing installation step 5 of 19: 'SetupOSD'.
2019/02/28 10:15:34 CLSRSC-594: Executing installation step 6 of 19: 'CheckCRSConfig'.
2019/02/28 10:15:34 CLSRSC-594: Executing installation step 7 of 19: 'SetupLocalGPNP'.
2019/02/28 10:15:56 CLSRSC-594: Executing installation step 8 of 19: 'CreateRootCert'.
2019/02/28 10:16:00 CLSRSC-4002: Successfully installed Oracle Trace File Analyzer (TFA) Collector.
2019/02/28 10:16:01 CLSRSC-594: Executing installation step 9 of 19: 'ConfigOLR'.
2019/02/28 10:16:11 CLSRSC-594: Executing installation step 10 of 19: 'ConfigCHMOS'.
2019/02/28 10:16:11 CLSRSC-594: Executing installation step 11 of 19: 'CreateOHASD'.
2019/02/28 10:16:16 CLSRSC-594: Executing installation step 12 of 19: 'ConfigOHASD'.
2019/02/28 10:16:17 CLSRSC-330: Adding Clusterware entries to file 'oracle-ohasd.service'
2019/02/28 10:17:22 CLSRSC-594: Executing installation step 13 of 19: 'InstallAFD'.
2019/02/28 10:17:28 CLSRSC-594: Executing installation step 14 of 19: 'InstallACFS'.
2019/02/28 10:17:35 CLSRSC-594: Executing installation step 15 of 19: 'InstallKA'.
2019/02/28 10:17:41 CLSRSC-594: Executing installation step 16 of 19: 'InitConfig'.

ASM has been created and started successfully.

[DBT-30001] Disk groups created successfully. Check /u01/app/grid/cfgtoollogs/asmca/asmca-190228AM101813.log for details.

2019/02/28 10:19:05 CLSRSC-482: Running command: '/u01/app/190/grid/bin/ocrconfig -upgrade grid oinstall'
CRS-4256: Updating the profile
Successful addition of voting disk d7a8be4444884f37bf1445998e475b4d.
Successful addition of voting disk 5f2c49eeb35d4f71bfa64279bfaa8cb9.
Successful addition of voting disk 93dbea13c3be4f11bf14e05a0556cfac.
Successfully replaced voting disk group with +OCR_VOTE.
CRS-4256: Updating the profile
CRS-4266: Voting file(s) successfully replaced
##  STATE    File Universal Id                File Name Disk group
--  -----    -----------------                --------- ---------
 1. ONLINE   d7a8be4444884f37bf1445998e475b4d (/dev/oracleasm/disks/OCR_VOTE1) [OCR_VOTE]
 2. ONLINE   5f2c49eeb35d4f71bfa64279bfaa8cb9 (/dev/oracleasm/disks/OCR_VOTE2) [OCR_VOTE]
 3. ONLINE   93dbea13c3be4f11bf14e05a0556cfac (/dev/oracleasm/disks/OCR_VOTE3) [OCR_VOTE]
Located 3 voting disk(s).
2019/02/28 10:20:25 CLSRSC-594: Executing installation step 17 of 19: 'StartCluster'.
2019/02/28 10:21:27 CLSRSC-343: Successfully started Oracle Clusterware stack
2019/02/28 10:21:27 CLSRSC-594: Executing installation step 18 of 19: 'ConfigNode'.
2019/02/28 10:23:05 CLSRSC-594: Executing installation step 19 of 19: 'PostConfig'.
2019/02/28 10:23:38 CLSRSC-325: Configure Oracle Grid Infrastructure for a Cluster ... succeeded

[Node 2 - root.sh]
[root@rac19c02 ~]# /u01/app/190/grid/root.sh
Performing root user operation.

The following environment variables are set as:
    ORACLE_OWNER= grid
    ORACLE_HOME=  /u01/app/190/grid

Enter the full pathname of the local bin directory: [/usr/local/bin]:
   Copying dbhome to /usr/local/bin ...
   Copying oraenv to /usr/local/bin ...
   Copying coraenv to /usr/local/bin ...


Creating /etc/oratab file...
Entries will be added to the /etc/oratab file as needed by
Database Configuration Assistant when a database is created
Finished running generic part of root script.
Now product-specific root actions will be performed.
Relinking oracle with rac_on option
Using configuration parameter file: /u01/app/190/grid/crs/install/crsconfig_params
The log of current session can be found at:
  /u01/app/grid/crsdata/rac19c02/crsconfig/rootcrs_rac19c02_2019-02-28_10-24-21AM.log
2019/02/28 10:24:27 CLSRSC-594: Executing installation step 1 of 19: 'SetupTFA'.
2019/02/28 10:24:27 CLSRSC-594: Executing installation step 2 of 19: 'ValidateEnv'.
2019/02/28 10:24:27 CLSRSC-363: User ignored prerequisites during installation
2019/02/28 10:24:27 CLSRSC-594: Executing installation step 3 of 19: 'CheckFirstNode'.
2019/02/28 10:24:28 CLSRSC-594: Executing installation step 4 of 19: 'GenSiteGUIDs'.
2019/02/28 10:24:29 CLSRSC-594: Executing installation step 5 of 19: 'SetupOSD'.
2019/02/28 10:24:29 CLSRSC-594: Executing installation step 6 of 19: 'CheckCRSConfig'.
2019/02/28 10:24:29 CLSRSC-594: Executing installation step 7 of 19: 'SetupLocalGPNP'.
2019/02/28 10:24:30 CLSRSC-594: Executing installation step 8 of 19: 'CreateRootCert'.
2019/02/28 10:24:30 CLSRSC-594: Executing installation step 9 of 19: 'ConfigOLR'.
2019/02/28 10:24:33 CLSRSC-594: Executing installation step 10 of 19: 'ConfigCHMOS'.
2019/02/28 10:24:33 CLSRSC-594: Executing installation step 11 of 19: 'CreateOHASD'.
2019/02/28 10:24:35 CLSRSC-594: Executing installation step 12 of 19: 'ConfigOHASD'.
2019/02/28 10:24:35 CLSRSC-330: Adding Clusterware entries to file 'oracle-ohasd.service'
2019/02/28 10:24:52 CLSRSC-4002: Successfully installed Oracle Trace File Analyzer (TFA) Collector.
2019/02/28 10:25:40 CLSRSC-594: Executing installation step 13 of 19: 'InstallAFD'.
2019/02/28 10:25:41 CLSRSC-594: Executing installation step 14 of 19: 'InstallACFS'.
2019/02/28 10:25:43 CLSRSC-594: Executing installation step 15 of 19: 'InstallKA'.
2019/02/28 10:25:44 CLSRSC-594: Executing installation step 16 of 19: 'InitConfig'.
2019/02/28 10:25:52 CLSRSC-594: Executing installation step 17 of 19: 'StartCluster'.
2019/02/28 10:26:43 CLSRSC-343: Successfully started Oracle Clusterware stack
2019/02/28 10:26:43 CLSRSC-594: Executing installation step 18 of 19: 'ConfigNode'.
2019/02/28 10:26:56 CLSRSC-594: Executing installation step 19 of 19: 'PostConfig'.
2019/02/28 10:27:02 CLSRSC-325: Configure Oracle Grid Infrastructure for a Cluster ... succeeded

Oracle Database 19c: Grid Infrastructure / RAC Installation - Part 2/3

In this blog I discuss from the part where you have setup your machine and ready to do your Linux configuration
This is a 3 Blog Series and this is Blog 2
Of this Blog series - 
Part 1
Part 3 

(Make sure you have internet connectivity)
Linux Configuration (on Both nodes)
1. Install rpm's via yum


  • yum install oracle-database-preinstall-19c.x86_64 -y
  • yum install oracleasm-support -y
  • yum install kmod-oracleasm.x86_64 -y
  • yum install bind -y
  • yum install kmod -y
  • yum install kmod-libs -y

2. Groups and User Addition

  • groupadd -g 54331 asmadmin
  • useradd -g oinstall -G asmadmin,dba -u 54232 grid
  • Set password for root, oracle and grid user

3. Copy secure/limits.d

  • cd /etc/security/limits.d/
  • In file oracle-database-preinstall-19c.conf duplicate all entries and change the user to grid.

4. Add huge pages

  • vi /etc/sysctl.conf
  • vm.nr_hugepages = 10000
  • sysctl --system

5. Swap Creation - Refer Blog - Swap Creation

6. Update Contents of /etc/profile 

if [ $USER = "oracle" ]; then
  if [ $SHELL = "/bin/ksh" ]; then
    ulimit -p 16384
    ulimit -n 65536 
  ulimit -s 32768
  else
    ulimit -u 16384 -n 65536
    ulimit -s 32768
  fi
fi

if [ $USER = "grid" ]; then
  if [ $SHELL = "/bin/ksh" ]; then
    ulimit -p 16384
    ulimit -n 65536 
  ulimit -s 32768
  else
    ulimit -u 16384 -n 65536
    ulimit -s 32768
  fi
fi

Network Configuration (on both nodes)

7.  Contents of /etc/hosts file 
(The key thing here is to configure your machines as per below addresses. 
There will be 3 interfaces on Virtual box One public, 2 private to Cluster - One for ASM communcation and one Private for Cluster Communcation

192.168.10.51 rac19c01.novalocal rac18c01
192.168.10.52 rac19c02.novalocal rac18c02
192.168.10.61 rac19c01-vip.novalocal rac18c01-vip
192.168.10.62 rac19c02-vip.novalocal rac18c02-vip

192.168.30.21 rac19c01-priv01.novalocal rac18c01-priv01
192.168.30.22 rac19c02-priv01.novalocal rac18c02-priv01


8. DNS Configuration (On Node 1 only)
(After you clone the machine - make sure you disable named service on the cloned machine 

File - /etc/named.conf - Make the changes as given below

Change 1  - Add highlighted entry
options {
        listen-on port 53 { 127.0.0.1;192.168.50.51; };  

Change 1.1
        allow-query     { 192.168.10.0/24; };

Change 2 - remove the below section
zone "." IN {
type hint;
file "named.ca";
};

Change 3 -  and add this in the end of the file

zone "novalocal" IN {
type master;
file "novalocal.zone";
allow-update { none; };
};


Create file /var/named/localdomain.zone with contents as below

$ cat /var/named/novalocal.zone

$TTL  86400
@ IN SOA      novalocal. novalocal.(
42          ; serial (d. adams)
3H          ; refresh
15M         ; retry
1W          ; expiry
1D )        ; minimum

                                 IN NS   rac19c01.novalocal.
localhost                        IN A    127.0.0.1
rac19c01.novalocal.                IN A    192.168.10.51
rac19c02.novalocal.                IN A    192.168.10.52
rac19c01-vip.novalocal.            IN A    192.168.10.61
rac19c02-vip.novalocal.            IN A    192.168.10.62
rac-scan.novalocal.            IN A    192.168.10.71
rac-scan.novalocal.            IN A    192.168.10.72
rac-scan.novalocal.            IN A    192.168.10.73


File - /etc/resolv.conf - create this file as below (On both nodes)

$ cat /etc/resolv.conf

nameserver 192.168.10.51
search novalocal
options attempts:1
options timeout:1

Finally enable the named.service and restart it
Note - the systemctl utiltity used instead of conventional chkconfig and service utility

$ systemctl enable named.service
$ systemctl restart named.service


9.  ORACLEASM Configuration
[As root on All Nodes  ]
$ oracleasm configure -i
Configuring the Oracle ASM library driver.

This will configure the on-boot properties of the Oracle ASM library
driver.  The following questions will determine whether the driver is
loaded on boot and what permissions it will have.  The current values
will be shown in brackets ('[]').  Hitting <ENTER> without typing an
answer will keep that current value.  Ctrl-C will abort.

Default user to own the driver interface []: grid
Default group to own the driver interface []: asmadmin
Start Oracle ASM library driver on boot (y/n) [n]: y
Scan for Oracle ASM disks on boot (y/n) [y]: y
Writing Oracle ASM library driver configuration: done

$ oracleasm init

[As root on Node 1]
(Ensure the disks are partitioned, no FS required though)

$ oracleasm createdisk OCR_VOTE1 /dev/xvdc1
Writing disk header: done
Instantiating disk: done

$ oracleasm createdisk OCR_VOTE2 /dev/xvdd1
Writing disk header: done
Instantiating disk: done

$ oracleasm createdisk OCR_VOTE3 /dev/xvde1
Writing disk header: done
Instantiating disk: done

[As root on All nodes]
$  oracleasm scandisks
Reloading disk partitions: done
Cleaning any stale ASM disks...
Scanning system for ASM disks...
Instantiating disk "OCR_VOTE1"
Instantiating disk "OCR_VOTE2"
Instantiating disk "OCR_VOTE3"

10.  Create Directories and Unzip Software 
[As root user on both/all nodes] 

mkdir /u01 
mkdir /u01/app
chown root:oinstall /u01 /u01/app
chmod 755 /u01 /u01/app

mkdir /u01/app/190
chown grid:oinstall /u01/app/190
chmod 755 /u01/app/190

mkdir /u01/app/grid
chown grid:oinstall /u01/app/grid
chmod 755 /u01/app/grid

mkdir /u01/app/oraInventory
chown grid:oinstall /u01/app/oraInventory
chmod 755 /u01/app/oraInventory

[As grid user]
mkdir -p /u01/app/190/grid


The next part of the blog discusses on the real installation